
Home > User Support > CoverageMaster winAMS FAQ
CoverageMaster winAMS FAQ
CasePlayer2 Analysis
D01_01: How do I setup CasePlayer2 to use the advanced analysis mode, or link with CoverageMaster?
Question:
I would like to use CasePlayer2's advanced analysis mode, or link with CoverageMaster. What settings are necessary?
Answer:
CoverageMaster must be linked with CasePlayer2 and the source code successfully analyzed in order to measure Branch (C1) coverage or MC/DC coverage, to auto-detect a functions Input/Output variables or to auto-generate test data. When using CoverageMaster General, CasePlayer2 also serves as a compiler to create the object file (*.xlo) for testing.
CasePlayer2 uses a different analysis engine (ANSI-C, C99, GNU-C and VC++) depending on the selected analysis mode. CasePlayer2 parses the source files and analyzes the source code the same way that a standard compiler would.
To be able to use the analysis data from CasePlayer2, the analysis must complete successfully, meaning that any Analysis Errors (except Warnings) must be resolved.
In practice, the analysis starts when "Create Documents" or "Re-create all Documents" is selected from the "Project" menu. Errors will be displayed in the Message View at the bottom of the window.
To use the analysis data with CoverageMaster winAMS, the Advanced Mode must be enabled. To do this and complete the analysis, follow the procedure below.
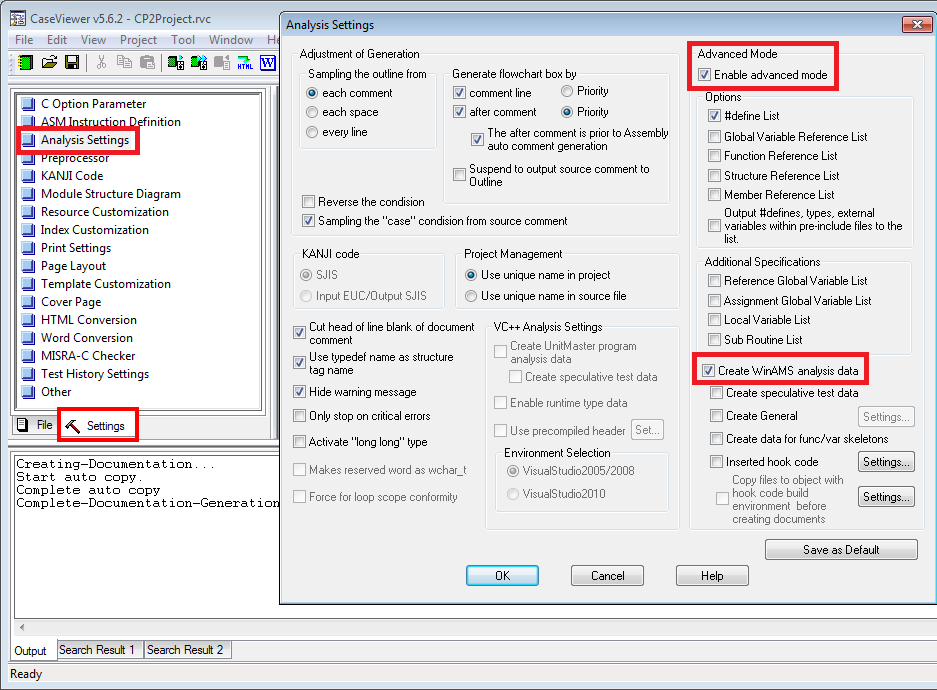
1. Enable the Advanced Mode in the "Settings" tab "Analysis Settings" window.
Check "Enable advanced mode" and "Create WinAMS analysis data".
These two are the only options required to link the tools, but additional specifications lists can also be generated if desired.
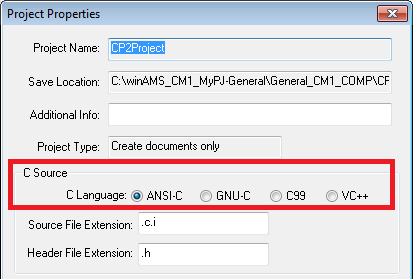
2. Select the C Source Language Standard.
When creating a new CasePlayer2 Project, one of the following C Languages Standards must be selected in the Language Settings: ANSI-C, GNU-C, C99, or VC++. Further, enable the "Analyze C++ files" option if the project includes C++ source code to be analyzed. This setting can also be changed later by selecting "Properties" in the "Project" menu.
Note: To select options other than ANSI-C, an "Extended Language" optional license is required. These options will be greyed out if no license is found.
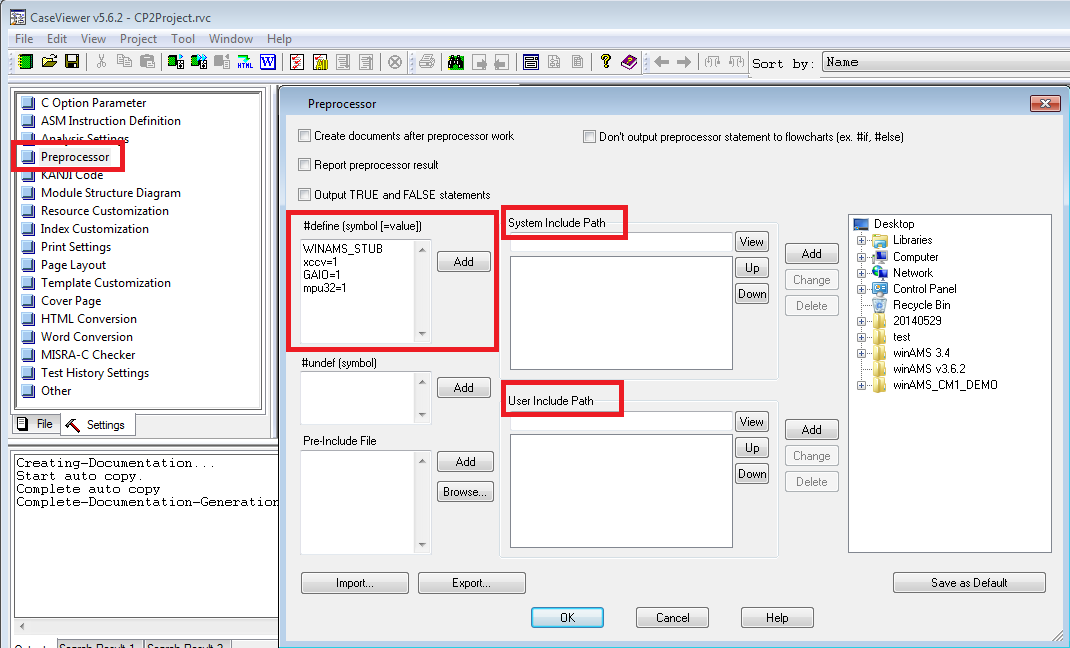
3. Preprocessor Settings
In the "Settings" tab, double-click "Preprocessor". This is where the compiling options are set, such as compile flags set directly in the makefile or in the code with "#define", or the paths to System Include files and User include files. Enter the same settings that are used by your cross-compiler.
Note:
The Include Path settings do not include subfolders. Each folder that contains header files must be set
individually in the "User Include Path" or "System Include Path".
If the path is not set correctly, you might encounter errors like the ones below:
CasePlayer2: No such file or directory
CasePlayer2-E-CPP: File I/O error occurred. (file_path)
4. C Option Parameter Settings
In the "Settings" tab, double-click C Option Parameter".
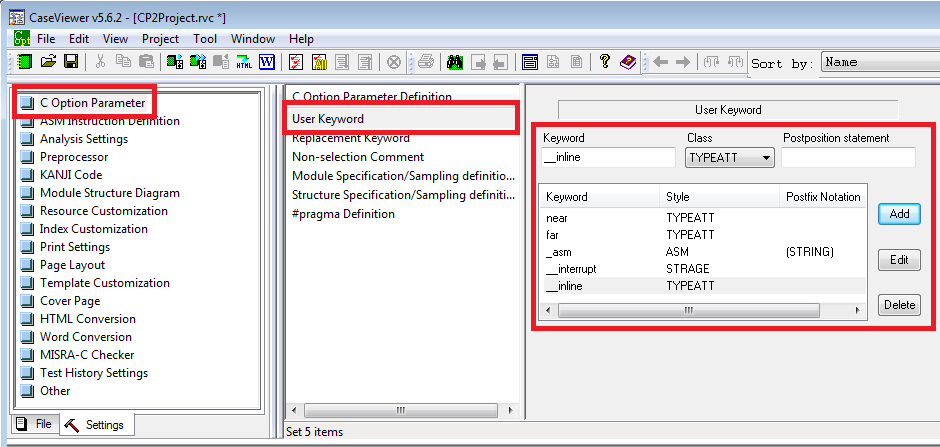
This is where compiler-specific keywords are registered. CasePlayer2 supports different languages and coding standards, but does not support all keyword and pragma descriptions for every compiler. Here compiler specific keywords must be defined for CasePlayer2 to be able to complete the analysis.
While this can be done manually, the process can be partially automated. When creating a new CasePlayer2 Project, the "CPU and Compiler Settings" option can be selected. When a new project is created with a specific combination of CPU and Compiler , known keywords are automatically added to the C Option Parameter settings. However, this setting cannot be modified once the project has been created.
Note: CasePlayer2 records of compiler-specific keywords may not be complete for all compiler versions. In this case undefined keywords must be added manually.

The following examples are typical "User Keyword" settings to avoid analysis errors.
Example 1: int near p1;
Register "near" keyword as "TYPEATT" type to analyze as a type modifier.
Keyword: near, Type: TYPEATT, Postfix description: (empty)
Example 2: direct int array[100];
Register "direct" keyword as "STRAGE" type to analyze as a storage class.
Keyword: direct, Type: STRAGE, Postfix description: (empty)
Example 3: __asm (" ....... ")
Register "__asm" keyword as "ASM" type to analyze as an inline assembly description.
Keyword: __asm, Type: ASM, Postfix description: (EXPRESSION)
Example 4: __except ( ....... )
Register " __except" keyword as "IGNORE" type to ignore during analysis.
Keyword: __except, Type: IGNORE, Postfix description: (EXPRESSION)
The following examples are typical "Replacement Keyword" settings to replace undefined keywords in the code.
Example 1: typedef __WCHAR_T_TYPE__ _Wchart;
Replace "__WCHAR_T_TYPE__" with "int".
Replace what: __WCHAR_T_TYPE__, Replace with: int
Example 2: typedef __SIZE_T_TYPE__ _Sizet;
Replace "__SIZE_T_TYPE__" with "int".
Replace what: __SIZE_T_TYPE__, Replace with: int
Most analysis errors can be fixed using the above described settings ("User Keywords" and "Replacement Keywords").
Please refer to the CasePlayer2 Manual for details regarding additional settings.
Reference:
CasePlayer2 Tutorial (PDF):
https://www.en.gaio.co.jp/eng/users/CP2_QOITUBEVDCPB/caseplayer2_eng_tutorial.pdf
When using a Renesas Compiler (formerly NEC Electronics), the definitions for the MPU's I/O ports and Registers are in a proprietary "Device File" that must be converted to a header file and added to the CasePlayer2 Project. For details refer to the following page:
If you are using the IAR compiler, there is a method to efficiently retrieve the settings. For details, see the FAQ below.
If you are using the GCC compiler, there is a method to efficiently retrieve the settings. For details, see the FAQ below.
Related Technical Tips Search
Other technical tips in GAIO's web site can be searched for using the links below.
Search key word link: Settings with CoverageMaster
Technical Tips Google Search